Chainsaw sharpener maintenance starts with cleaning and inspecting the parts that locate the chain: the vise rails, cutter stop, angle plate, depth stop, pivots, and grinding wheel. If the machine has begun producing uneven cutters, heat marks, or changing contact points, disconnect it and find the source of the drift before grinding another full loop.
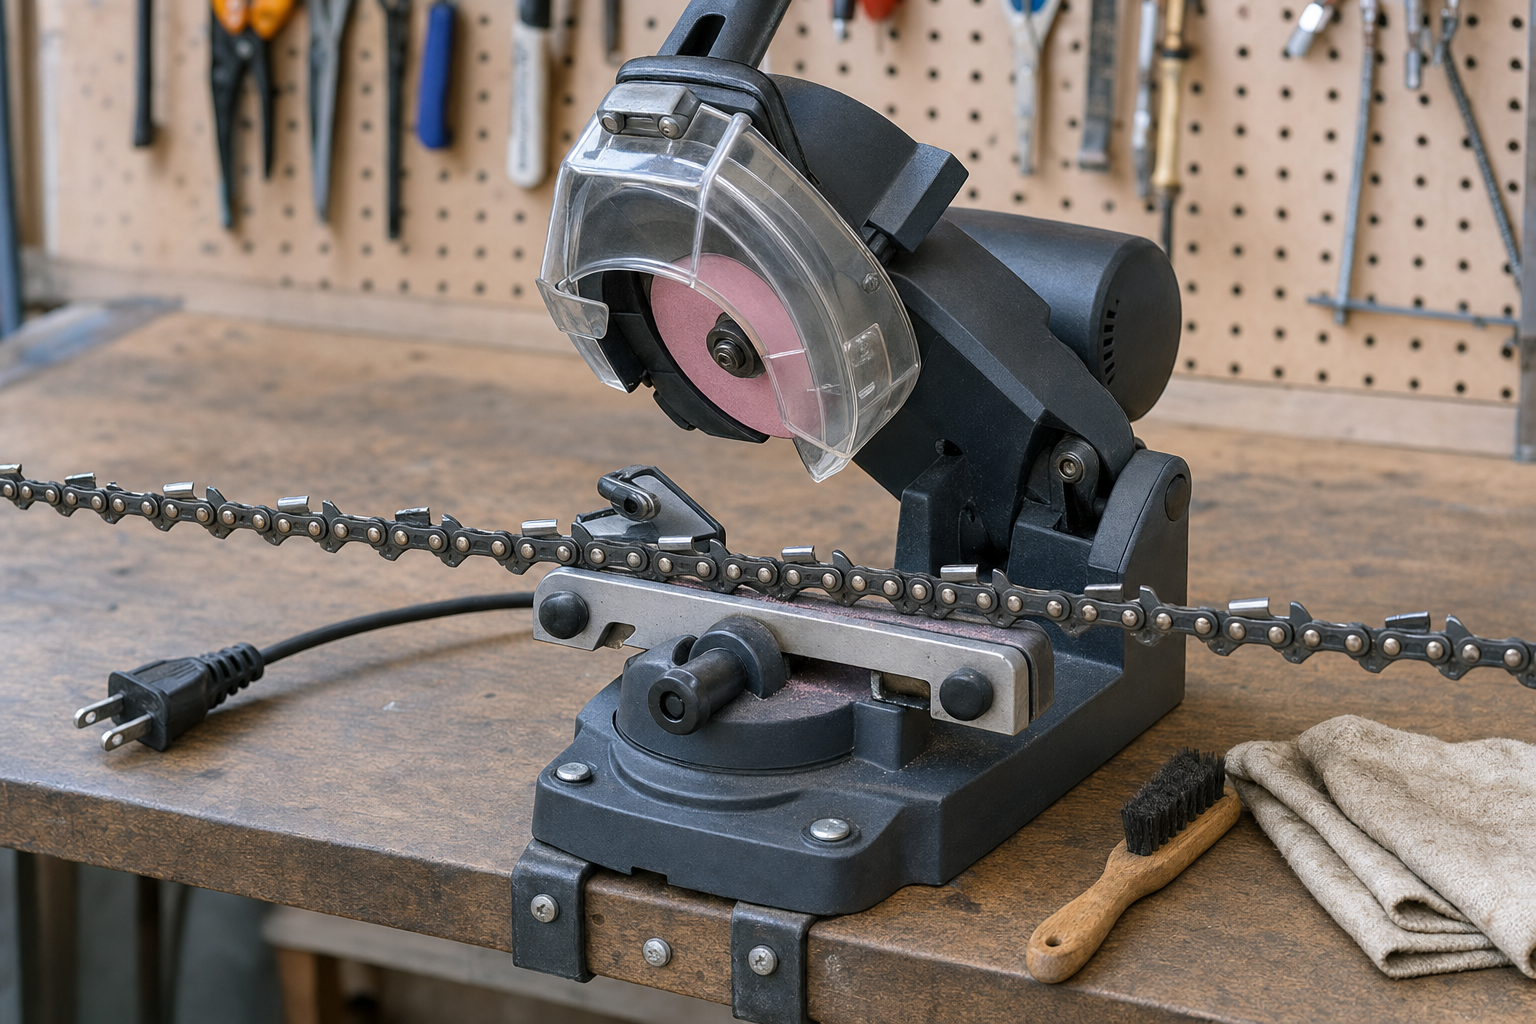
This routine is for an owner who already has a bench grinder and wants it to repeat the same setup from cutter to cutter. It does not replace the grinder or chain manual. Those instructions determine the correct wheel, profile, settings, inspection method, and service limits for the equipment in front of you.
Read the last chain before touching an adjustment
A grinder often reveals its maintenance need in the pattern it leaves behind. Put the machine aside and inspect the last chain in bright light. Compare several left-hand cutters with several right-hand cutters, not just the easiest tooth to see.
Use the pattern to choose the first stationary check:
| Result on the chain or machine | Inspect first, with power disconnected | What separates the likely causes |
|---|---|---|
| Contact point moves from tooth to tooth | Vise rails, chain seat, cutter stop, clamp pressure | Debris or side play lets nominally similar cutters sit differently |
| One side is consistently shorter | Indexing stop, vise centering, angle setting, reference cutter choice | A repeatable left-versus-right pattern points to setup; random short teeth may reflect earlier damage |
| Cutter edge darkens during brief grinding | Wheel face and profile, depth stop, amount removed per contact | A loaded wheel or deep stop can add heat; persistent discoloration needs the fuller burned-cutter diagnosis |
| Grinder vibrates or the wheel appears to move sideways | Wheel condition, mounting faces, guard, fasteners | Stop using the machine if damage is visible or the cause cannot be established |
| Settings change during a pass | Angle plate lock, head pivot, cutter stop, depth stop | A loose control moves; a dirty scale can merely make the setting hard to read |
| Chain still cuts poorly although edges look clean | Cutter equality, depth gauges, bar, tension, lubrication | Not every cutting fault begins at the grinder |
This is a routing tool, not a reason to run a suspect wheel. Cracks, chips, abnormal vibration, damaged mounting parts, or an unexplained electrical fault are stop conditions.
Clean the locating surfaces, not just the visible dust
Unplug the sharpener and wait for the wheel to stop. Remove the chain if it blocks the surfaces you need to inspect. Keep the plug where it is visible so the machine is not casually reconnected while you work.
Brush grinding residue from both vise rails, the guide slot, cutter stop face, depth-stop contact point, angle plate, and the ledges around the swivel base. Oily filings trapped against a rail can hold one drive link differently from the next. A clump behind the cutter stop can change where the following tooth indexes even though the adjustment knob has not moved.
Use the residue location to decide what to verify next:
| Where residue collects | False reading it can create | Check after cleaning |
|---|---|---|
| Between the vise rails or in the chain guide | A drive link sits high or rocks, so the cutter meets the wheel at a different height | Slide four comparable drive links through the unpowered vise and confirm that each seats without rocking |
| On the cutter-stop face or its hinge | Nominally equal cutters index at different fore-aft positions | Bring four undamaged cutters from the same side to the stop and compare the stationary contact point |
| Under the turntable or against an angle scale | The table appears indexed while debris prevents it from seating or obscures the mark | Move to the manual’s reference position, lock it, and check that the assembly does not shift |
| At the head stop or pivot contact | The wheel stops at a changing depth | Lower the disconnected head several times and watch whether it meets the same point without adjustment creep |
| On the wheel face | A glazed or loaded surface cuts slowly and encourages longer contact | Follow the wheel-specific manual: dress an intact compatible wheel only by its approved method; replace a damaged wheel |
This map separates cleaning from adjustment. Do not change an angle or deepen a stop until the locating surfaces are clean and the stationary check still shows an error.
The Oregon 510A manual specifies careful cleaning with a rag or brush and explicitly says not to use compressed air on that model. A Clarke sharpener manual specifies a dry paintbrush for grinding residue and warns against aggressive detergents or chemicals. Your grinder may call for a different method, so follow its manual. Do not direct liquid into the motor, switch, bearings, or wiring, and do not assume compressed air is acceptable unless the maker says so.
After cleaning, slide a chain through the unpowered vise. Each drive link should seat without rocking on packed debris. Bring four undamaged cutters from the same side to the stop one at a time. The stop should meet the same part of each comparable cutter, and the clamp should hold without tipping the chain. Four checks are enough to reveal a repeating seat or stop problem without pretending that already damaged cutters are identical.
Check the wheel as a cutting surface and as a component
Look at the wheel face, working edge, bore area, and mounting hardware without removing the guard unless the manual’s maintenance procedure requires it. A shiny or metal-loaded cutting surface is different from a cracked, chipped, or wobbling wheel.
Oregon’s bench-grinder instructions call for checking wheel condition and profile, dressing to the prescribed shape, and stopping after abnormal vibration. STIHL’s USG instructions likewise place wheel selection, a test run, and a profile check before sharpening. Those sequences matter: dressing can expose abrasive and restore a permitted profile, but it cannot repair structural damage or make an incompatible wheel suitable.
Use only the dressing tool and method specified for your machine and wheel. If you are deciding whether an intact glazed wheel can be dressed or must be discarded, use the detailed dress-or-replace wheel criteria rather than judging by color or age alone.
Test the stops and pivots without grinding
With the machine still disconnected, set it according to the chain and grinder instructions. Move the head through its normal travel slowly. The depth stop should meet at the same point each time without the adjustment creeping. The head pivot should move freely but should not have unexplained side play. The angle plate and vise should lock at the selected position.
Next, mark one sound reference cutter. Seat it against the stop, clamp it, and lower the stationary wheel close enough to inspect alignment without scraping the cutter. Release the chain, advance through several cutters on the same side, and repeat. If the apparent contact point shifts, find out whether the cutter shapes already differ or whether the vise and stop are failing to locate them consistently.
Do not correct a mechanical drift by setting the wheel deeper. That removes more steel while preserving the underlying error.
Make one controlled verification before committing the loop
Reconnect the machine only after the stationary checks pass, the guard is installed, and the work area is clear. Follow the manual’s startup position, protective equipment, and test-run procedure. Stand where the instructions direct, and stop immediately for abnormal sound, vibration, wheel movement, or loose hardware.
Use a damaged or end-of-life practice chain when possible. Set the lightest cut that will show where the wheel meets one reference cutter. After the wheel stops, inspect the edge and compare the contact to the intended profile. One tooth is enough to expose a wrong wheel position, an over-deep stop, or a chain that is not seated squarely.
Only proceed around the loop when that result is correct and repeatable. If cutter lengths have already drifted, do not blindly copy the shortest tooth; the different-cutter-length decision method explains when correction is reasonable and when it would waste too much remaining cutter.
Match the maintenance burden to the grinder
A bench grinder suits an owner who has stable bench space, can verify chain and wheel compatibility, and values indexed, repeatable adjustments across multiple chains. The current KonKell 230W bench chainsaw sharpener page presents an adjustable grinding head and rotating chain vise for a fixed bench workflow.
Those listings establish the product fit for a bench-maintenance workflow, not the correct setup for every chain. Confirm the required wheel and settings from the chain information and machine instructions before use. The heavier bench format also assumes a secure mounting location; it is not the convenient choice for field touch-ups.
Use a maintenance interval based on evidence
Before each session, inspect the cord, plug, guard, wheel, clamp, and visible fasteners; brush the locating surfaces clean; then verify one reference cutter. After a session, remove residue using the manual-approved method and store wheels, dressers, and setup information where they will not be struck, contaminated, or mixed with unverified substitutes.
Pause during a batch when the machine or cutter result changes. A fixed calendar cannot detect a freshly chipped wheel, a stop loosened by vibration, or a pitch change from the previous chain. The useful interval is before use, after a change in setup, and immediately after any new symptom.
Stop and seek the manufacturer or a qualified service provider when the machine has damaged wiring, a cracked or chipped wheel, persistent abnormal vibration, a guard or mounting fault, or play that the user instructions do not cover. Stop working on the chain when its structural damage or remaining cutter material makes further sharpening unsuitable.